
DevLog #5 – How we use datamaps to build levels easily
Hello everyone!
Last week, we talked about our tool to quickly generate a mesh library from a tileset. Today, let’s dive deeper into how we create levels!
Placing meshes by hand in a gridmap can get really tedious. Since building a level is an iterative process and the gridmap editor is not very practical, we wanted to come up with something easier. Besides, if we place for instance a grass tile at height 1, then we might also have to put below a cliff wall. This results in two actions performed while there is actually only one logical decision. Thus, we can automatize part of the process.
Describe levels with a datamap
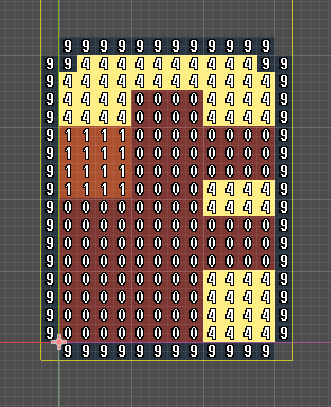
We thought about the minimum set of information we needed to fully describe a level. The world is 3D, but we can actually work with a projection in the XZ plane. To shape the terrain, we then simply need to know the altitude of each tile, which gives a height map. If we use a json format to store the data, we get for instance something like that:
{
   "0":{
      "0":{
         "height":2
      },
      "1":{
         "height":2
      }
   }
}
In this example, we have two tiles at coordinates (0, 0) and (0, 1), both at height 2. We use a dictionary instead of a matrix to specify coordinates because it offers more flexibility. We don’t have to stick with rectangular shapes or to bother with a mask to indicate valid cells. The dictionary simply contains all existing tiles.
Then, we write a terrain generator that reads all the tiles in this data and place meshes at the right spot in our gridmaps. The base idea of this generator is pretty simple, but the code actually became a lot more complex as we refined the generation. We give more details about that later below.
A height map is great, but we can give more information easily, for example textures:
{
   "0":{
      "0":{
         "height":2
         "floor_texture":GRASS
         "wall_texture":STONE_CLIFF
      }
   }
}
The generator then reads this data and chooses the right mesh from the mesh library to fit the texture set. The strength here is that we can easily add more fields to describe our terrain, we only have to specify how the generator deals with them. This json data is what we call very creatively… a datamap! To make a level, we do not have to bother with gridmaps, we write a datamap and our generator takes care of everything for us.
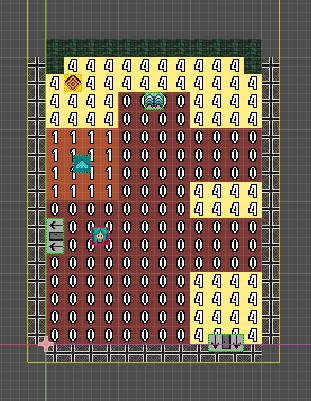
Building datamaps in the Godot 2D workspace
At this point, you may say that we haven’t solved our initial problem yet, and you are right. Obviously, we do less things manually thanks to the generator. However, we replaced editing gridmaps in Godot by writing a text file. This doesn’t sound more enjoyable… That’s why we take things back into the Godot editor!
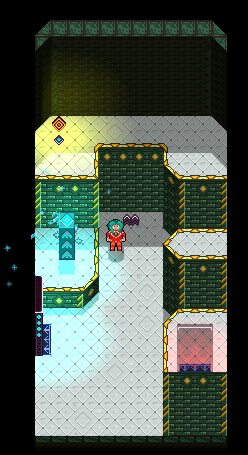
GridMap and TileMap nodes are great. You can place tiles with GDScript, but also retrieve existing tiles! We create a 2D node that will be a template. We add some tilemaps acting as layers. One for heights, one for floor textures and one for wall textures. We then attach a script to this node. When we run the scene, the code reads all the tiles in the different layers, and builds the json data. It then sends it to the generator and we can see the resulting terrain! Here is below a datamap edited in Godot and the generated level:

The result is also saved as a scene file in the project. We then instanciate it in a Spatial node which will be the scene actually played in the game. This allows us to add more nodes to the level if we want to, but also to regenerate the terrain if needed: everything is automatically updated and no manual addition gets deleted.
Refining terrain generation
The terrain generator quickly got more complex as we make the result look better. Building the invisible collision gridmap is fairly easy, but placing the rendering meshes involves more work. Here are a few details:
- Walls. We place only walls where the player can actually see them to avoid useless drawing. We also have different texture variations depending on the adjacent walls.
- Borders. We determine automatically where to place borders by looking at the adjacent tiles data. If we have to draw one, the generator also decides the right orientation.
- Diagonals. We do not specify diagonals in the datamap. Those are automatically placed by the generator based on simple rules to smooth the shape of the terrain.
- Map lower limit. We have an option so that the generator adds bottom floor textures where needed.

- Decorative patterns. The generator uses several passes. During the first one, it decides all the diagonals. Then, it computes what to draw where. Before building the final gridmaps from this data, we have another pass to refine the generation. For instance, we randomly change some textures in the floor to add patterns or variations.

- Minimap. While building the terrain, we generate a minimap picture where the terrain is clearly visible. We represent every tile by a block of
3 x 3pixels.

Adding markers
Now that we have a tool to easily build terrain, let’s go even further! We enriched our editor with what we call markers. They are simple 2D sprites that we place above the tilemaps. They also have a script and a special function called when we run the generation. Each marker loads an object and places it at the right spot in the scene. Since markers have the same exported parameters than the object they correspond to, they also forward their values to set everything up.
In the end, we build the terrain with layers, and we design all the logic with markers. For instance, we place a pressure plate marker and we specify which group it should trigger. Or we place a door marker and specify which other level it connects to.
We build most of our levels in the 2D workspace and the 3D scenes get automatically generated. We spent a while to write this datamap editor, but now it saves us a lot of time! In the future, we will probably extend it with more functionalities to ease creating content for the game even more.
This concludes for now our mini-series about how we create levels in Project “Stasis”. Please tell us in the comments if you liked these posts, and feel free to ask questions! Next week, we will start to talk about gameplay mechanics.
We are also finalizing the tech demo that we intend to release in the upcoming weeks. It will feature 15-20 minutes of gameplay and will consist in the first half of what will be later the starting dungeon of the game. Expect puzzle solving and some fighting! Stay tuned and thanks for reading us!
See you next time!